

When I first started researching “how are dash cams powered,” I realized there are so many options to choose from—it can get overwhelming! Over 80% of dash cams rely on simple plug-and-play solutions like the cigarette lighter socket. But did you know some advanced setups can even work when your car is off? Find out why a dash cam is essential for every driver in our insightful article, Why Every Driver Should Have a Dash Cam.
Dash cams are more than just cool gadgets—they’re your extra pair of eyes on the road, with sales hitting nearly 12 million units worldwide last year. Whether it’s a quick drive or parking overnight, powering your dash cam right is the first step to getting the most out of it.
Quick Look
Dash cams are powered through a connection to your car’s electrical system, typically via the cigarette lighter or a hardwiring kit. They can also be powered by the vehicle’s fuse box for a more permanent setup. Some models offer battery-powered options or backup batteries for parking mode.
Can I connect a dash cam directly to my car’s battery?
Yes, you can technically connect a dash cam directly to your car’s battery, but it’s not recommended due to the potential risk of draining the battery. Dash cams typically need a constant power supply, and if left on without the vehicle running, they can quickly deplete your car’s battery, especially if the engine is off for an extended period.
A safer option would be to use a hardwiring kit that connects the dash cam to the fuse box, which helps prevent battery drain and ensures the dash cam only operates when the car is on or in parking mode. Need help with installation? Learn the step-by-step process in our post, How to Install Dash Cam Wire in Car.
How Are Dash Cams Powered?
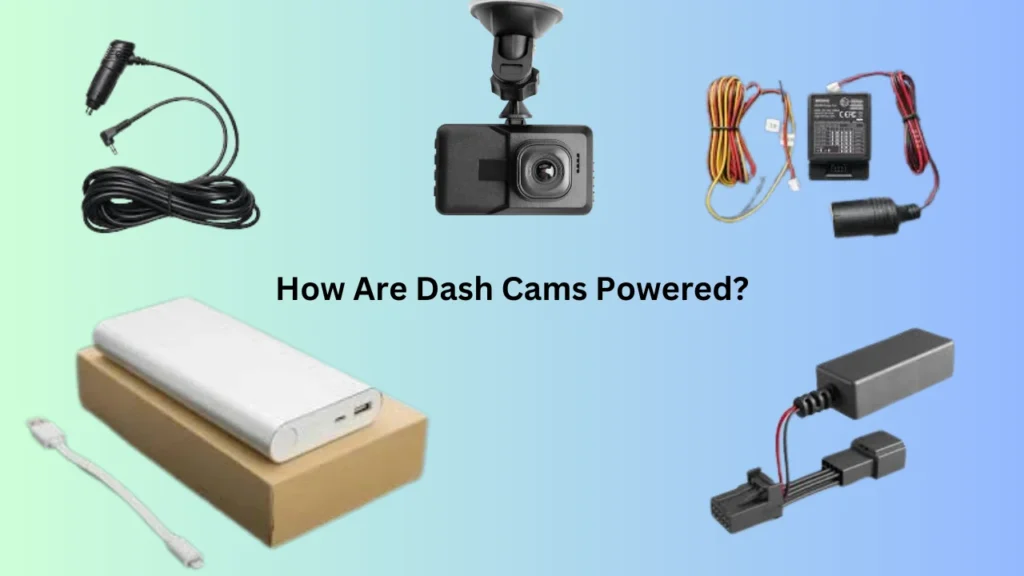
Powering Dash Cams via Cigarette Lighter Socket

When it comes to powering dash cams, using the cigarette lighter socket is by far the easiest option. Most vehicles, including 95% of modern cars, come equipped with this port, making it a common go-to solution for beginners.
How It Works
The cigarette lighter socket delivers a steady 12-volt power supply to your dash cam. All you need to do is plug in the adapter provided with your camera. The process takes under 2 minutes, and you’re ready to go.
Advantages
This method is ideal for people like me who don’t want to mess with technical wiring. It’s quick and portable, letting you remove the dash cam easily. Plus, it works well for short-term setups or rental cars.
Disadvantages
One downside is the visible wiring, which can look messy. Also, the socket stays powered in only 60% of cars when the engine is off. If you want parking mode, you’ll need to check your car’s compatibility.
Considerations for Parking Mode
If you’re like me and want the dash cam recording 24/7, this method may fall short. Parking mode requires a continuous power supply, and the cigarette lighter socket doesn’t always provide that. You might need a workaround.
Hardwiring Dash Cams to the Fuse Box

Hardwiring a dash cam to your car’s fuse box is a great way to keep things neat and organized. It allows you to power your device without cluttering up your cigarette lighter socket or dealing with visible wires. But before diving in, let’s see what makes this setup work.
Advantages of Hardwiring
One of the main benefits of hardwiring your dash cam is that it keeps everything hidden, which is especially great if you’re aiming for a clean, professional setup. Plus, this method frees up your cigarette lighter socket, which usually comes in handy for other devices like your phone charger. You’ll also get access to features like parking mode that wouldn’t be possible with the other power methods.
Requires Technical Knowledge
However, this option isn’t for everyone. Hardwiring involves connecting the dash cam to the fuse box, which can be tricky if you’re not familiar with your vehicle’s electrical system. The whole process can take anywhere from 30 minutes to 2 hours, depending on the complexity of the wiring and whether you’re installing it yourself or hiring a professional.
Safety Considerations
When hardwiring, you’ll want to be mindful of the safety aspect. Using a proper hardwiring kit that includes low voltage protection is crucial. It prevents draining your car’s battery by cutting power when it gets too low. This ensures your vehicle will still start even if the dash cam runs for extended periods while parked. Curious about how dash cams function? Our article, How Do Dash Cams Work? explains everything.
Using Dedicated Dash Cam Battery Packs

If you’re looking for a power solution that doesn’t drain your car’s battery, dedicated battery packs for dash cams could be a game changer. These external batteries allow your dash cam to run even when the vehicle is off, which is perfect for parking mode.
How Battery Packs Work
These battery packs are designed to be hardwired into your vehicle. They store power from your car’s electrical system and supply it to your dash cam when needed. Some models, like the BlackVue B124X, provide up to 16 hours of continuous recording without using your car’s battery.
Advantages of Battery Packs
The biggest perk is the prevention of battery drain in your car. A quality battery pack ensures your vehicle’s battery won’t get depleted, especially during long periods of parking. With these packs, you can enjoy uninterrupted parking mode and even record incidents for extended periods.
The Cost Factor
Battery packs typically range from $100 to $250, depending on the model and capacity. While this is an additional investment, it’s a solid option for those who want peace of mind knowing their dash cam is always powered, even when the engine is off.
Space and Installation Considerations
Installing these battery packs requires some space in your vehicle, usually in the trunk or under the seat. It’s also a bit more complex than using a cigarette lighter, so having a professional install it is a good idea. But once installed, you won’t have to worry about power for months at a time.
Powering Dash Cams via Rearview Mirror Adapters

If you’re looking for a discreet way to power your dash cam, a rearview mirror adapter might just be the solution you need. These adapters tap into your vehicle’s auto-dimming mirror for power, keeping your setup clean and sleek.
Minimal Visible Wiring
One of the biggest perks of using a rearview mirror adapter is that there’s no visible wiring cluttering up your dashboard. This is especially great for those who prefer a tidy setup without the mess of hanging wires. Many adapters integrate seamlessly into your car’s existing system, making them almost invisible once installed.
Easy Installation for Compatible Cars
Installation is relatively easy, but it’s important to note that not every vehicle is compatible. For example, if your car has an auto-dimming mirror, you’re in luck, as these adapters work directly with them. The installation process typically takes between 30 to 45 minutes, and you don’t need to worry about complex wiring.
Limited Compatibility
The main downside is that these adapters only work with certain mirror types, limiting their use to specific vehicles. For example, if your car doesn’t have an auto-dimming rearview mirror, you’ll need to explore other powering options. So, always check your vehicle’s compatibility before purchasing one of these adapters.
Cost of Rearview Mirror Adapters
Expect to pay anywhere between $30 to $80 for a rearview mirror power adapter, depending on the brand and features. This price is generally a good investment considering the clean and secure power solution it offers without the hassle of other setups.
Dongar Technologies’ Adapter
A popular choice in the market is Dongar Technologies’ rearview mirror power adapter, which connects directly to the vehicle’s mirror. This adapter is designed for ease of use, and many users report no issues with installation. The cost is around $60, which is a fair price for the convenience it provides. To understand your dash cam’s location tracking, read our guide on How to Read Dash Cam GPS Data.
Factors to Consider When Choosing a Power Source
When deciding how to power your dash cam, there are a few factors I always consider before making a final choice. These factors can help me pick the most reliable, efficient, and cost-effective power method for my vehicle.
Vehicle Type Matters
The type of vehicle I drive plays a significant role in the power choice. For example, if I drive a newer car, I might be more inclined to hardwire the dash cam since modern vehicles often support constant power for such devices. But if my vehicle is older, I may opt for the cigarette lighter socket because it’s a simpler, plug-and-play option.
Power Mode Requirements
If I want to use parking mode, this will heavily influence my choice. Some power sources, like hardwiring, are great for ensuring the dash cam runs even when the engine is off. On average, dash cams with hardwiring kits can run for 12-24 hours in parking mode, depending on the battery or vehicle power supply.
Ease of Installation
I’m all for convenience, so if I don’t want to spend hours on installation, a cigarette lighter socket or a rearview mirror adapter might be the way to go. Both options are easy to install and don’t require technical know-how. On the other hand, hardwiring can take anywhere from 30 minutes to 2 hours, depending on whether I choose to do it myself or hire a professional.
Ongoing Costs
It’s essential to think about the long-term costs of powering my dash cam. While the cigarette lighter socket is essentially free, using external battery packs like the BlackVue B124X comes with an initial cost of around $100 to $200. However, it prevents draining the vehicle’s main battery, which can be worth the investment in the long run.
Safety and Battery Drain
I always make sure to avoid power options that might drain my vehicle’s main battery. Hardwiring kits typically include low voltage protection, preventing the dash cam from drawing too much power. This feature is especially useful if I plan to leave the dash cam running in parking mode for long periods, ensuring the car’s battery remains intact. For tips on keeping your car’s interior neat, check out our article, How to Hide Dash Cam Wires.
Final Words
So, if you’re still wondering how are dash cams powered, there are several solid options to consider. I personally recommend hardwiring your dash cam, as it provides a clean installation and supports features like parking mode.
With hardwiring, you can ensure continuous power. For those seeking a more flexible option, a dedicated battery pack, like the BlackVue B124X, can provide up to 24 hours of backup. Ultimately, it’s all about finding the best solution for your vehicle and needs.